'79 CDV: 425 out 500 in!

Exhaust system: looked into having Stan's Headers Auburn, WA installing duel system with Magflow equip (about $ 900 total) but since I either had to tow or drive it to the shop (20+ miles) and I need some way to quiet it down during start up and breakin, no way I could run this thing unmuffled in my neighborhood, I decided to do something my self, atleast temporary for the mentioned reasons.
After looking at different outfits set up and pics of layouts and cost factor, went with one of Summit's exhaust system in a box plus an H pipe kit got the one for GM 1967-72 A body from the pics looked like to could work (about $ 220 total) this option atleast gets me on the road and I haven't spent too much.
Since I have the Sanderson 600 shorties and the kit was for headers I knew the head pipe was too short, but it looked like it could be used for the mid tunnel foreward to just past the crossmember to the H pipe and have the right offset, this after cutting off the bell end.
I'm using a short flex pipe for the collector to H pipe section, after start ups and breakin and some run time will get new head pipe made up and installed. Seemed like all areas fit well and will weld up after any adjustments as needed.

Bruce,
 

Attachments

  • IMG_0257.webp
    IMG_0257.webp
    89.3 KB · Views: 8,820
  • IMG_0252.webp
    IMG_0252.webp
    31.3 KB · Views: 8,818
  • IMG_0251.webp
    IMG_0251.webp
    54.3 KB · Views: 8,819
  • IMG_0255.webp
    IMG_0255.webp
    50.4 KB · Views: 8,820
  • IMG_0258.webp
    IMG_0258.webp
    65.1 KB · Views: 8,819
Thanks to all for the coments.

Dave, wheels are American Racing mags model 200S polished.

Maddog, hope interior will help in next years summer shows, atleast give them something different to look at, hope it will blow their Chevy/Ford/Mopar minds!

Ted, thanks, just waiting to see how it will look with the engine in.

Bruce,
 
When you get the engine in and the exhaust all hooked up you'll have to do us a video
so we can hear that puppy.

What kind of mufflers are those? Are they the Summit brand/Flowmaster knockoffs? Or a Summit turbo style?

"EZ"
 
Guess it's time to get to the engine. the core '75 SDV, pretty much the std list of hop up parts:
KB pistons +.030, PEP forged rods, MTS # 10 cam,MTS shaft rockers,CPP oversized valves,springs, retainers/locks, 2215 manifold, Cad 600 headers, holley SA 870 carb.

Dress up: PML valve covers, CadCo cast oil pan, cast trans pan, cast flexcover.

Paint: Rustoleum Engine paint Old Ford Blue, was the closest match to the PML blue covers, painted just about every thing that didn't move or look cross eyed.

Had machine shop do short block and heads, they did a good job and were interested in the project,they found a few things that needed attention that I would have never thought of so it seems to have worked out ok. Took longer than I planned but I got alot of things done that I would have never done otherwise.

I ported the heads before the oversized valves were cut, 1st time I ever did something like this, also beam polished the con rods. Used alot of the info off the forum and thank all the guys for their efforts in working the heads and posting for others to benefit.

Bought about 60/40 $ ratio between MTS and CPP got good info and service from both Marty , Matt and Jerry, my machinist had a question on something for both outfits and was impressed on their knowledge and how courteously he was treated.

Got a few pics of this puppy not, it's more like a Hogg!

Bruce,
 

Attachments

  • IMG_0226.webp
    IMG_0226.webp
    55.5 KB · Views: 8,805
  • IMG_0228.webp
    IMG_0228.webp
    49.6 KB · Views: 8,805
  • IMG_0229.webp
    IMG_0229.webp
    48 KB · Views: 8,805
  • IMG_0230.webp
    IMG_0230.webp
    51.1 KB · Views: 8,805
  • IMG_0234.webp
    IMG_0234.webp
    51.7 KB · Views: 8,805
A few more:
 

Attachments

  • IMG_0235.webp
    IMG_0235.webp
    53.8 KB · Views: 8,798
  • IMG_0239.webp
    IMG_0239.webp
    47.9 KB · Views: 8,798
  • IMG_0240.webp
    IMG_0240.webp
    48.3 KB · Views: 8,798
  • IMG_0242.webp
    IMG_0242.webp
    55.4 KB · Views: 8,799
  • IMG_0245.webp
    IMG_0245.webp
    47.7 KB · Views: 8,798
Wow! Looks great Dude. I hope you'll do us a video. I want to hear those mufflers with that cam.
What kind of mufflers are they?

"EZ"
 
Really nice, especially because it appears that all work was done in your driveway under that canopy. Does it snow in your part of Wa.? Also whose dizzy, starter, and fuel pump?

Can't wait to hear/see it run, John.
 
Thanks for all the kinds words.

Mufflers are the Summit turbos that came with their kit, kinda small- should let some rumbles through!

Fuel pump; RobbMc and inline filter, RobbMC starter, disb I rebuilt with Proform kit, and Mr Gasket cent weights and shim kit. Taylor wire and clips.

John, it snowed 7-8 " of wet/heavy crap 3-4 times last Christmas/New Years period, had a light canopy that collapsed( I should have taken it down :dunce: )so I got this heavy duty on from Sam's Club- took 2 guys to load in my pickup. And I've got it tied down with 4 anchor screws on each side, had a few windy days that raised hell with it :yikes: but it's still here!

Bruce,
 
A few pics I forgot about;

Beam polished the PEP rods, found this plastic Stanley vice at Home Depot, didn't have to worry about damaging the rods and it positioned them nicely.

A raditator ordered off E Bay opened it up and found it curved/drooped about an inch. Had to have been made that way, no kinked tubes or the top/bt u channels. When I called they asked if it could have happened during shipping, told them no way and they sent a good replacement. You guessed it- made in China :no: , serves me right.
Bruce,
 

Attachments

  • IMG_0114.webp
    IMG_0114.webp
    53.8 KB · Views: 8,741
  • IMG_0126.webp
    IMG_0126.webp
    85.7 KB · Views: 8,742
:eyepopping: ...never seen anything like that before, wonder what happened?
 
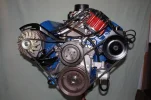
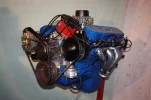
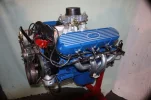
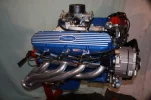
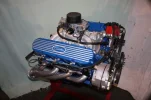
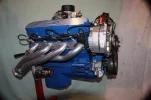
Finally installed engine on Thursday after screwing around for a few months. :cloud9:

Over all it went well, but had a few problems. I think most problems people run into are of their own making and this was the case here. :banghead: When I pulled the 425 out I did it with as much stuff still attached as possible, including the trans. I was trading it to a paint/body man to prep and paint the car next spring so I agreed to give him a set up he could just drop into his car, I pulled a few small things I needed. Also I though this would give an idea on how much stuff I could install before the drop, learned a few things.

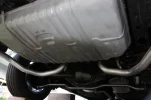
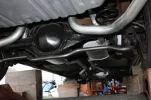
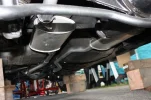
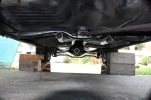
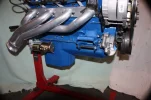
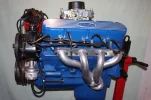
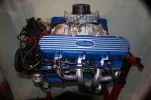
I installed the headers and couple of engine lifts rings I found in the yard, this led to the main problem. I put the lift rings at the #1 and #8 exhaust, should have put #8 at the #6 position, would have given better balance what with the trans hooked up, and eliminated the interference with the brake booster and the shift arm on the steering column. Headers didn't have any clearence problems, I used my repo saw to trim about 1/8" off the passagner side rear control arm bushing housing, the only touch of either header. Also had to cut out the driver side lift ring, wanted to leave it in for the look but it had to go.

The second problem was the CadCo cast oil pan, it's about an inch or so deeper in the slump than the stock pan and because of this combined with the trans being attached the angle needed increased to get it to fit. This caused the tranny top to hit the trans tunnel and wedged the pan bottom on the engine crossmember :cursing: After a few repositions using intake bolts for lift and much pushing and prodding it moved back and in, only a little surface rubs an nicks, get out the spray bombs, and have to check the brake lines mounted on the crossmember.

I did this way because I didn't want to have to install the trans, headers, ect, laying under the car, seems like when I hit my 60's alot of strength got lost somehow. :yikes: Don't have any overhead capacity and joints are always sore, nothing I can't live with, just want to conserve what I have.
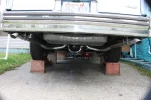
Spent Friday working on damage control( very little) and on hooking up remainder of exhaust, now into Sat on this. Now that I'm working on the exhaust again I think it would have been beter to have just waited until the engine was in and go from there. Sometimes you know better but you do it any way, like I said we make most of our own problems. Had one pipe that I cut too short, I could have made it work and it would have been ok, but it looked SO much better moving it 2" :yes:

This post is getting too long, hope I haven't become boring, you sometimes wounder how much detail to go into but I guess someone well let me know. Will take some more pics this weekend, OMG that BBSOB(Big Beautiful Son of a Bi..h , enough of this BBC crap )looks so fanastic. :cloud9: And work toward D day (1st start) either Tues/Weds.

Bruce,
 
Congrats Bruce!!

You didn't go into too much detail. I like reading along. Keep posting . Keep the pics coming.

"EZ"
 
Bruce: great post and perfect detail. some pics of that bad bay in there would be great.

Maddog
 
Back
Top